Tracks & Throws
May 2, 2023
RPOs have changed the game of football significantly. It has become the norm to make it easier for our Quarterbacks to put defenders in conflict while being totally scheme friendly. Theoretically, we want to stay consistent with our spacing, timing, and thoughts. Our system puts emphasis on developing a keen sense of “making the gap right”. In this article, I will discuss how we have been successful in implementing this excellent drill called “Tracks & Throws”.
By implementing this drill we have been able to create more explosive plays as well as control the box. Tracks & Throws is a simple RPO drill that we utilize as an offensive skill group. This drill consists of QBs, RBs, and WRs. In this drill you will need at least 8 flat agility bags, 8 cones, and at least 8 footballs. The main objective of “Tracks & Throws” is to utilize time within our practice schedule to take reps with an RPO mindset. We want to accomplish proper spacing, timing, correct tracks (RBs), ball security, start/stance, mesh exchanges, and scheme recognition all in one.
We utilize “Tracks & Throws” in our practice schedule at least 2 times a week. As stated previously, our sole purpose is to be able to multi-task and work on several different components of our game during this period. This period usually takes 10-15 minutes. The structure of this drill is very simple. Coaches will need 8 agility bags, 8 cones, and 8 footballs. There will be 2 spots that the QB will take snaps from so split the football evenly for a continuous flow. Only one side of the field will be utilized, so WRs can travel together.
Runningbacks will align according to the call. Wide receivers will be in two lines (Outside WRs/Inisde WRs). The coach calls out a scheme that sets the running back’s tracks, plus tags the route the WRs will run. There are two balls that work this drill. The 1st ball initiates the exchange between the QB/RB. The running back attacks his aiming point in works through the obstacles of the agility bags (simulated defenders/traffic) The 2nd ball is for the WRs. The WRs work off the 2nd ball so that the timing of the throw is matched. When snapped, the QB will set his lower half in conjunction with the route that is being run. The QB must be able to position himself smoothly in order to handle the second snap.
A cone is set at 20 yards from the LOS. Each ball handler must explode and finish through the cone for the finish, showing a burst. As you get better at it, conflict defenders can be added. Coaches can work off 1 ball and everyone goes. The defender dictates where the ball goes.
The Initial Setup of “TNT’’
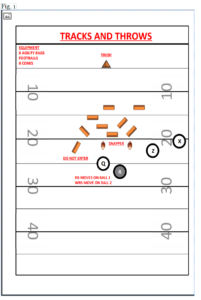
In diagram 1 we detail the initial setup of “TNT” (Tracks & Throws). The equipment needed is also listed in the diagram. Cones can be used if a coach does not have enough agility bags. Usually, we will need 8 agility bags, 8 footballs, and 5 cones. As stated, only 10-15 minutes is needed for this period. Spacing and alignments are crucial for setup. Usually, about 20-25 yards of field is needed. The drill can be accomplished on one side. Two snap locations are used as well. Make sure the snaps are correct in order to accomplish great timing.
The agility bags are set up inside so that the running backs can run their track. The bags simulate defenders so that the backs can make realistic cuts moving through their tracks. After the backs break through the 2nd level they then must burst through the finish cone. This sets the standard for our backs to work through trash or traffic, then explode and finish the run.
QB/RB Mesh/Exchange
In fig. 2 is where we focus on the first phase of the RPO. The run action is initiated by ball #1. During this phase, we like to put an emphasis on ball security. It is very important that our exchanges and mesh situations are clean. The QB and RB will handle the ball more than anyone on the field. It is critical that we pay close attention to the box’s alignment. Pay attention to depth and alignment. Proper stance and alignment are important when it comes to the design of the run scheme. Backs should also be creating proper pockets in the exchange.
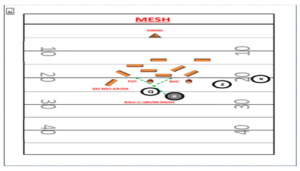
After receiving the call, the RB will align accordingly. He will then run his “Tracks”. The agility bags are thrown down is a specific design so that the RB can become familiar with his track With his aiming point in mind, the back has to maneuver his way through traffic to make realistic cuts.
Here we point out certain techniques and movements of the front. It is important that the running back knows or has a thought process of where different defenders are located. During this same phase, we also incorporate backfield movements that the back may participate in. Once the first ball is snapped we want to pay attention to proper footwork. When the exchange is made we are looking to see if the RB is carrying the ball properly. High and Tight with four points of emphasis is what we look for.
Immediately when the first ball is snapped the RB will get in phase with the QB. He will react as if there are live defenders pursuing him. With the agility bags in place, the RB will build muscle memory by making game-like cuts on his way to an explosive run. We like to see fluency and sharp cuts. Make sure while the RB is progressing to pay attention to his pad level. It also important to pay attention to his different cuts. Make sure it is what we are teaching.
In fig 2 you can also see that we have boundaries for our RBs. We never want our guys running wildly and blindly with the football. To ensure that, we set boundaries for our runners based on the particular scheme we are running at the time. Our runners get a true insight on how to fit into the run scheme.
The RB should move through the agility bags smoothly. Inform them to mix up their runs. Basically, don’t think the same front or second-level movement occurs every single time. We like to teach “Slow to it, and Fast through it”. Be patient and let the play develop. We like for our RB to maintain a great running posture with lethal ball security. Here, you should also concentrate on his lean and body control. Make sure no false steps are present. After the RB breaks the second level, he must then make one cut, burst, and finish through the finish cone to create an explosive play.
With the boundaries, our RBs get a true feel, or muscle memory on how to shape the run. We usually have a coach standing in the “Do Not Enter” zone. We preach getting vertical, especially on inside or downhill runs. As mentioned, our running backs have 3 options; bang it, bend it, or bounce it. Although bouncing the ball happens, we don’t encourage it.
The Pass Option
While having the proper stance, the WR will have his eyes inside waiting on the second ball to be snapped. This is also another way to work on ball get off and concentrating on moving when the ball moves.
The route or the “TAG” will be given to the WR. Even though there are two lines of WRs, only one line will go at a given time. The coach needs to make sure to alert which set of WRs are live, and which are dead. Primarily, it’s best to start outside and work in. The WRs will have cones to help with spacing based on where we are on the field. Again, this allows us to stretch our opponents and to assure we are taking game-like reps. The WRs will start to build a sense of urgency once this has been done consistently.
The next phase is the takeoff. Make sure WRs are in a great stance and being explosive. We also focus on eliminating false steps and keeping our pad level down. According to what has been called, the WR is expected to get to his landmark and then get in and out of his break. There should be a high catch percentage while accomplishing this drill.
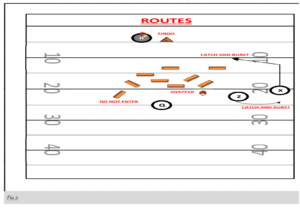
From a WR perspective, Tracks and Throws allow them to get on the same page with the QB. Timing is everything. That’s why we go with two balls in this drill so everyone gets work. After the catch, the WR needs to plant tight, get vertical and finish through the cone.
For more information about the AFCA, visit www.AFCA.com. For more interesting articles, check out The Insider and subscribe to our weekly email.
If you are interested in more in-depth articles and videos, please become an AFCA member. You can find out more information about membership and specific member benefits on the AFCA Membership Overview page. If you are ready to join, please fill out the AFCA Membership Application.
« « Previous PostNext Post » »
RPOs have changed the game of football significantly. It has become the norm to make it easier for our Quarterbacks to put defenders in conflict while being totally scheme friendly. Theoretically, we want to stay consistent with our spacing, timing, and thoughts. Our system puts emphasis on developing a keen sense of “making the gap right”. In this article, I will discuss how we have been successful in implementing this excellent drill called “Tracks & Throws”.
By implementing this drill we have been able to create more explosive plays as well as control the box. Tracks & Throws is a simple RPO drill that we utilize as an offensive skill group. This drill consists of QBs, RBs, and WRs. In this drill you will need at least 8 flat agility bags, 8 cones, and at least 8 footballs. The main objective of “Tracks & Throws” is to utilize time within our practice schedule to take reps with an RPO mindset. We want to accomplish proper spacing, timing, correct tracks (RBs), ball security, start/stance, mesh exchanges, and scheme recognition all in one.
We utilize “Tracks & Throws” in our practice schedule at least 2 times a week. As stated previously, our sole purpose is to be able to multi-task and work on several different components of our game during this period. This period usually takes 10-15 minutes. The structure of this drill is very simple. Coaches will need 8 agility bags, 8 cones, and 8 footballs. There will be 2 spots that the QB will take snaps from so split the football evenly for a continuous flow. Only one side of the field will be utilized, so WRs can travel together.
Runningbacks will align according to the call. Wide receivers will be in two lines (Outside WRs/Inisde WRs). The coach calls out a scheme that sets the running back’s tracks, plus tags the route the WRs will run. There are two balls that work this drill. The 1st ball initiates the exchange between the QB/RB. The running back attacks his aiming point in works through the obstacles of the agility bags (simulated defenders/traffic) The 2nd ball is for the WRs. The WRs work off the 2nd ball so that the timing of the throw is matched. When snapped, the QB will set his lower half in conjunction with the route that is being run. The QB must be able to position himself smoothly in order to handle the second snap.
A cone is set at 20 yards from the LOS. Each ball handler must explode and finish through the cone for the finish, showing a burst. As you get better at it, conflict defenders can be added. Coaches can work off 1 ball and everyone goes. The defender dictates where the ball goes.
The Initial Setup of “TNT’’
In diagram 1 we detail the initial setup of “TNT” (Tracks & Throws). The equipment needed is also listed in the diagram. Cones can be used if a coach does not have enough agility bags. Usually, we will need 8 agility bags, 8 footballs, and 5 cones. As stated, only 10-15 minutes is needed for this period. Spacing and alignments are crucial for setup. Usually, about 20-25 yards of field is needed. The drill can be accomplished on one side. Two snap locations are used as well. Make sure the snaps are correct in order to accomplish great timing.
The agility bags are set up inside so that the running backs can run their track. The bags simulate defenders so that the backs can make realistic cuts moving through their tracks. After the backs break through the 2nd level they then must burst through the finish cone. This sets the standard for our backs to work through trash or traffic, then explode and finish the run.

QB/RB Mesh/Exchange
In fig. 2 is where we focus on the first phase of the RPO. The run action is initiated by ball #1. During this phase, we like to put an emphasis on ball security. It is very important that our exchanges and mesh situations are clean. The QB and RB will handle the ball more than anyone on the field. It is critical that we pay close attention to the box’s alignment. Pay attention to depth and alignment. Proper stance and alignment are important when it comes to the design of the run scheme. Backs should also be creating proper pockets in the exchange.

After receiving the call, the RB will align accordingly. He will then run his “Tracks”. The agility bags are thrown down is a specific design so that the RB can become familiar with his track With his aiming point in mind, the back has to maneuver his way through traffic to make realistic cuts.
Here we point out certain techniques and movements of the front. It is important that the running back knows or has a thought process of where different defenders are located. During this same phase, we also incorporate backfield movements that the back may participate in. Once the first ball is snapped we want to pay attention to proper footwork. When the exchange is made we are looking to see if the RB is carrying the ball properly. High and Tight with four points of emphasis is what we look for.
Immediately when the first ball is snapped the RB will get in phase with the QB. He will react as if there are live defenders pursuing him. With the agility bags in place, the RB will build muscle memory by making game-like cuts on his way to an explosive run. We like to see fluency and sharp cuts. Make sure while the RB is progressing to pay attention to his pad level. It also important to pay attention to his different cuts. Make sure it is what we are teaching.
In fig 2 you can also see that we have boundaries for our RBs. We never want our guys running wildly and blindly with the football. To ensure that, we set boundaries for our runners based on the particular scheme we are running at the time. Our runners get a true insight on how to fit into the run scheme.
The RB should move through the agility bags smoothly. Inform them to mix up their runs. Basically, don’t think the same front or second-level movement occurs every single time. We like to teach “Slow to it, and Fast through it”. Be patient and let the play develop. We like for our RB to maintain a great running posture with lethal ball security. Here, you should also concentrate on his lean and body control. Make sure no false steps are present. After the RB breaks the second level, he must then make one cut, burst, and finish through the finish cone to create an explosive play.
With the boundaries, our RBs get a true feel, or muscle memory on how to shape the run. We usually have a coach standing in the “Do Not Enter” zone. We preach getting vertical, especially on inside or downhill runs. As mentioned, our running backs have 3 options; bang it, bend it, or bounce it. Although bouncing the ball happens, we don’t encourage it.
The Pass Option
While having the proper stance, the WR will have his eyes inside waiting on the second ball to be snapped. This is also another way to work on ball get off and concentrating on moving when the ball moves.
The route or the “TAG” will be given to the WR. Even though there are two lines of WRs, only one line will go at a given time. The coach needs to make sure to alert which set of WRs are live, and which are dead. Primarily, it’s best to start outside and work in. The WRs will have cones to help with spacing based on where we are on the field. Again, this allows us to stretch our opponents and to assure we are taking game-like reps. The WRs will start to build a sense of urgency once this has been done consistently.
The next phase is the takeoff. Make sure WRs are in a great stance and being explosive. We also focus on eliminating false steps and keeping our pad level down. According to what has been called, the WR is expected to get to his landmark and then get in and out of his break. There should be a high catch percentage while accomplishing this drill.

From a WR perspective, Tracks and Throws allow them to get on the same page with the QB. Timing is everything. That’s why we go with two balls in this drill so everyone gets work. After the catch, the WR needs to plant tight, get vertical and finish through the cone.
For more information about the AFCA, visit www.AFCA.com. For more interesting articles, check out The Insider and subscribe to our weekly email.
If you are interested in more in-depth articles and videos, please become an AFCA member. You can find out more information about membership and specific member benefits on the AFCA Membership Overview page. If you are ready to join, please fill out the AFCA Membership Application.

